Friday, June 3, 2011
Altered Apron Tutorial
I received this cute little apron made out of a ticking fabric when some friends & I served at the rehearsal dinner for our good friend's son's wedding. The food was catered and we played the role of caterers/servers. It was so much fun and a great way to help out our dear friend! Soon after that my mind started spinning with ideas to alter it!
Well fast forward a few years....yes, it took me that long! Another friend owns an adorable quilt shop here in Arizona called The Old World Quilt Shoppe. A mutual friend Cyndi and I took a trip over to Dee's shop and I decided that it was a good time to purchase some cute fabric for my apron make-over. I knew I wanted some bright fabric so these are the colors that I chose.
Next up I decided on ruffles....just simple ruffles, but with the bright colors I knew it would look good. So I cute a strip of fabric for the first ruffle, folded it over with the wrong sides together & ran a loose stitch on my machine across the top. (At this point I really should have either pinked the edges or ran a zig zag stitch along each edge but I didn't. I was too excited and jumped ahead.)
After pulling one string and gathering the ruffle to the desired fullness I pinned it to the apron and started stitching. I was so excited at this point with the look! :)
Next up...the second ruffle. I chose a bright orange and repeated the process that I used on the first ruffle. I need to add here that after you cut your fabric and fold it over it works best if you stop and iron your ruffle. It just gives it a crisp look and also makes it easier to work with while you are sewing.
Repeat the process for the third ruffle. I just love it so far! It was quick and easy and really changed the look of the apron.
Since I was so excited to put this together I left the edges unfinished and needed to hide that so I grabbed a piece of ribbon that I had been hoarding..I mean saving, and decided to stitch it right over the rough edge of the top ruffle. As I stitched I gently bunched up the ribbon so that it would have a more ruffled look itself. I am very happy with the result!
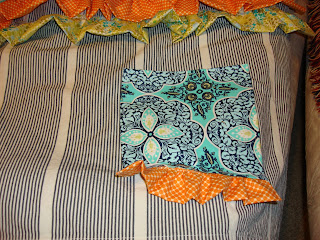
Originally I had planned on adding homemade flowers to the front of the apron but looking at it at this point I decided it needed something more. So I chose pockets! After all they would be very useful while teaching classes in my new apron! So I used the leftover fabric from the first ruffle and cut out pockets. I tried it with one large pocket but didn't like the look so ended up with two pockets. Simply cut the fabric a little larger than you want the pocket to be & fold the edges over twice so you have a nice clean edge & stitch. You could at this point sew two pieces of fabric together to make a stronger more durable pocket but knowing this would be used more for looks than actual storage I opted for a single cut of fabric. And of course what pocket is complete without a ruffle! I used the leftover orange fabric for the little ruffles making sure to turn the side edges in and stitch so that they would have a clean line. Also for these ruffles I chose to stitch them under the bottom edge of the pocket so that none of the rough edges would be visible. Measure where you want your pockets on the front of your apron and stitch down. Of course leaving the top open for use. :)
My original idea of handmade flowers using the fabric from the ruffles just didn't look right so I opted for a gerbera daisy from Michaels. I simply cut the stem off and hot glued it to the front of the apron.
Here is the final product! I am in love with it!!! So proud of myself for FINALLY finishing it!! Wahoo!
So grab a plain apron and alter it...you will be amazed with all the possibilities you can come up with to make it uniquely yours! ENJOY!!!
Subscribe to:
Post Comments (Atom)


No comments:
Post a Comment