Wednesday, June 8, 2011

Twisted Twelve x Twelve Class

I am excited to offer another class in my home! This one is called Twisted Twelve x Twelve! We will be creating a 12x12 album filled with 20 pages (10 front & back). Not your normal scrapbook...we will be twisting it up a bit. We will be stitching, painting, carving & stamping! Class will be Saturday June 18th from 11 am until 4 pm. With lunch included!


The front of the album will be covered & decorated. There will be different fabrics, paints & stamps available to alter the book & make it your own.


Below are a few samples of the pages we will be creating.


Most of the pages can be easily changed to match the theme that you want for the photos in your album. Your album will be uniquely yours!


It's going to be a fun day!! I can't wait!!

Tuesday, June 7, 2011

A Little Birthday Fun!


This weekend we had a combined birthday celebration for my boys! Sometimes parties come together quickly and easily and other times they are a little harder to pull together. This one took a little effort. :D But in the end it was a blast!! Wahoo!


These are a cute little idea that I found online. Chocolate dipping sauce from the fruit section of the grocery store & a microwave...you are ready to go. Dip the marshmallows into the chocolate & roll in crushed graham crackers. Smores on a stick! So cute and really delicious! I will definitely do this one again.


The nice part about having parties in the summertime is all the fresh fruit available. Yum! We also purchased BBQ Pulled Pork from Joe's Real BBQ a favorite around here! I put together small sandwiches with some bake & serve rolls from Sams Club..oh they are delicious. Lots of side dishes and of course the boys favorite Pretzel Salad. And you have a party!


This is the dessert table. We had cake, the Smores, zucchini bread ( gift from our neighbor) and wonderful cherry cinnamon rolls that my daughter-in-law made. I also served rootbeer floats. That was a hit! Who doesn't love a rootbeer float! Serve them in cute little mason jars...even better! So fun!


I found a cake pan at Michaels that I fell in love with. So with coupon in hand, off I went to buy it! So worth it! Such a fun little pan to use for parties. It says on the packaging that it requires 1 cake mix but I recommend 1 1/2 as the top section didn't quite fill completely. (I hid that part with frosting) ;) When you are finished you have an oversized cupcake! So cute!


Oh and I used my little upcycled candle holder to display the giant cupcake! I purchased it at a consignment shop for $6 and hung some crystals on it. I want to add a little more to it but that will come with time. I do love it! I plan on using some of these ideas again at other parties.


We ended the party with some swimming! It was such a nice day spent with family celebrating my boys! So worth the extra effort it took! I love my family!!!

Friday, June 3, 2011

Altered Apron Tutorial


I received this cute little apron made out of a ticking fabric when some friends & I served at the rehearsal dinner for our good friend's son's wedding. The food was catered and we played the role of caterers/servers. It was so much fun and a great way to help out our dear friend! Soon after that my mind started spinning with ideas to alter it!
Well fast forward a few years....yes, it took me that long! Another friend owns an adorable quilt shop here in Arizona called The Old World Quilt Shoppe. A mutual friend Cyndi and I took a trip over to Dee's shop and I decided that it was a good time to purchase some cute fabric for my apron make-over. I knew I wanted some bright fabric so these are the colors that I chose.


Next up I decided on ruffles....just simple ruffles, but with the bright colors I knew it would look good. So I cute a strip of fabric for the first ruffle, folded it over with the wrong sides together & ran a loose stitch on my machine across the top. (At this point I really should have either pinked the edges or ran a zig zag stitch along each edge but I didn't. I was too excited and jumped ahead.)
After pulling one string and gathering the ruffle to the desired fullness I pinned it to the apron and started stitching. I was so excited at this point with the look! :)


Next up...the second ruffle. I chose a bright orange and repeated the process that I used on the first ruffle. I need to add here that after you cut your fabric and fold it over it works best if you stop and iron your ruffle. It just gives it a crisp look and also makes it easier to work with while you are sewing.


Repeat the process for the third ruffle. I just love it so far! It was quick and easy and really changed the look of the apron.


Since I was so excited to put this together I left the edges unfinished and needed to hide that so I grabbed a piece of ribbon that I had been hoarding..I mean saving, and decided to stitch it right over the rough edge of the top ruffle. As I stitched I gently bunched up the ribbon so that it would have a more ruffled look itself. I am very happy with the result!
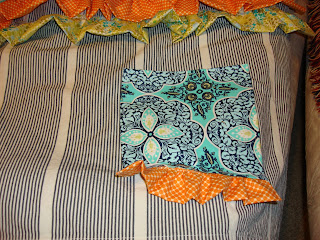

Originally I had planned on adding homemade flowers to the front of the apron but looking at it at this point I decided it needed something more. So I chose pockets! After all they would be very useful while teaching classes in my new apron! So I used the leftover fabric from the first ruffle and cut out pockets. I tried it with one large pocket but didn't like the look so ended up with two pockets. Simply cut the fabric a little larger than you want the pocket to be & fold the edges over twice so you have a nice clean edge & stitch. You could at this point sew two pieces of fabric together to make a stronger more durable pocket but knowing this would be used more for looks than actual storage I opted for a single cut of fabric. And of course what pocket is complete without a ruffle! I used the leftover orange fabric for the little ruffles making sure to turn the side edges in and stitch so that they would have a clean line. Also for these ruffles I chose to stitch them under the bottom edge of the pocket so that none of the rough edges would be visible. Measure where you want your pockets on the front of your apron and stitch down. Of course leaving the top open for use. :)


My original idea of handmade flowers using the fabric from the ruffles just didn't look right so I opted for a gerbera daisy from Michaels. I simply cut the stem off and hot glued it to the front of the apron.
Here is the final product! I am in love with it!!! So proud of myself for FINALLY finishing it!! Wahoo!
So grab a plain apron and alter it...you will be amazed with all the possibilities you can come up with to make it uniquely yours! ENJOY!!!

Wednesday, June 1, 2011

From the Garden

Came in on Memorial Day to find these on my counter!! What a great guy!!

Monday, May 30, 2011

Thank You

Thanks to the many men & women that keep our country safe! May God richly bless you and your families!

Saturday, May 28, 2011

In No Particular Order.........

 Spending the day working on our vacation album. Long over due!

 I must say it is a great way to relax over the long weekend. I am not complaining.
We had some neighbors over last night & sat out by the pool, chatting...it was great!


 Also plan on finally altering a fun little apron with fabric from my friends shop...The Old World Quilt Shoppe

 Hoping to have a few leftover scraps to decorate a cute little straw purse that I got the other day!.
Of course pics will follow! Dinner tonight with my Father-in-Law! Looking forward to not cooking..teeheehee  My mom took off after her hectic move to her new place. She is on a long road trip in a motorhome with my aunt. What a blast!! Tonight they are going to a class reunion in our hometown in Iowa! How fun for them both! I am SO happy for my mom!!
Next month she celebrates her 89th birthday! How cool is that!


Hope you are enjoying your Memorial Day Weekend with some fun activities!! Do something you LOVE!!

Tuesday, May 24, 2011

A New Day


A little time in my art journal......